From Scratch Web Games: A Beginners Guide to Game Development using HTML, CSS, and JavaScript
Chapter 2.11: HTML Only Game Solution
This is a very simple project. The key to this is realizing that you need pages for both the computer and for the player. The computer pages represent the decision that the computer is making with a link to the next player page while the player pages must lead to three computer pages. Thinking about this, not all pages are necessary as only pages that can be reached are necessary. Figuring this out could be done on the fly, but a little bit of planning makes this process much easier.
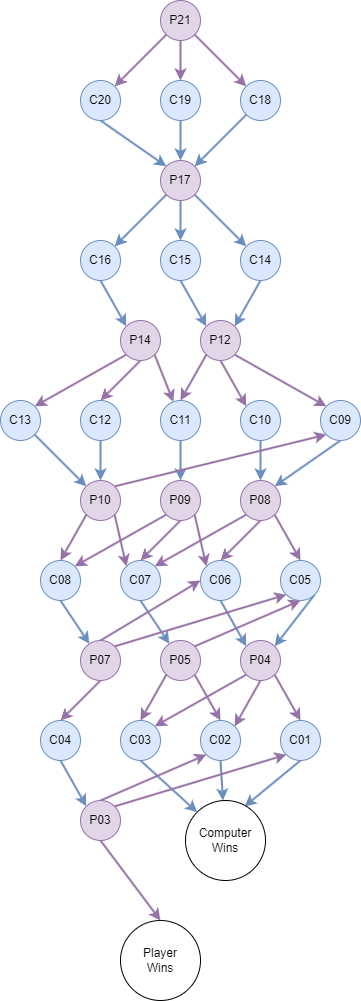
A state diagram is ideal for this type of problem. Here you have pages representing the different states of the game (example, C16 would be computer’s turn with 16 items remaining) from here the computer would simply choose how many items to take, and as the game is static we have the computer take 2 items. Two is an arbitrary number, with your design being however many you wanted. That number was determined by rolling a six-sided die, with 1-2 being computer take 1 item, 3-4 being take two items, and 5-6 being take three items.
Nodes are connected to other nodes based on triggers, which are essentially what link the player clicks on. For player pages, there are three choices each leading to one of the three computer pages. For computer choices there is only one choice so that leads to the appropriate player page. As you can see by my state diagram, there are situations where multiple computer pages go to the same player page which allows for a reduced number of pages. Instead of 41 pages, I only need 32. The best part is that as the pages are all very similar, you only need to create one single good page and then alter it for the other pages.

I started at the Player21 page and worked my way to the win pages, but the opposite path would also work. My page is very simple, here is a sample of the Player page with five items remaining.
<!DOCTYPE html>
<html lang="en">
<head>
<meta charset="UTF-8">
<title>Treasure NIM (no CSS/JS)</title>
</head>
<body>
<h1>Treasure NIM</h1>
<h2>Player's Turn</h2>
<img src="chest.png" alt="Treasure Chest">
<img src="coin.png" alt="coin">
<a href="NIM_02c.html"><img src="coin.png" alt="coin"></a>
<a href="NIM_03c.html"><img src="coin.png" alt="coin"></a>
<a href="NIM_04c.html"><img src="coin.png" alt="coin"></a>
<h2>There are 5 objects left, take how many?</h2>
<a href="NIM_04c.html">Take 1 item</a><br />
<a href="NIM_03c.html">Take 2 items</a><br />
<a href="NIM_02c.html">Take 3 items</a><br />
</body>
</html>
As you can see, I simply have images for each item remaining, with the last three images being links so the player can click on the coins instead of the text links. Next is some instructions with the proper links to each page that the player can go to.
This is repeated for each of the other pages, and is all there is to creating the game. It is, however, important that you do test each of the pages and make sure all the links work the way they should. The map above is handy for doing this testing as you can simply play through the game marking which triggers you tried and once you have checked off all of the triggers on the diagram then you have fully tested the paths through the game.
Sidebar
Chapter 2 Contents
2.1 HTML Basics Cheat Sheet
The cheat sheet for this chapter.
2.2 What is HTML
A brief history of HTML
2.3 Structure of a HTML Document
What makes up a HTML file
2.4 Tags and Elements
How tags are used to create HTML elements
2.5 Special Symbols
How to display things such as <, >, &, 😀
2.6 Links
Linking to other pages, other sites, and within the page
2.7 Images
Adding images and image maps to your page.
2.8 Lists
Ordered and unordered lists and nesting lists.
2.9 Tables
Tables with spanning rows and columns.
2.10 HTML Only Game Project
The game of NIM is the project for this chapter.
2.11 HTML Only Game Solution
How my solution to the NIM game was put together
Bonus article
Solving Nim.