
From Scratch Web Games: A Beginners Guide to Game Development using HTML, CSS, and JavaScript
Chapter 2.7: Images
One of the best ways of making text easier to read is to have images. Images help break up walls of text making the text seem less intimidating. They are also useful to help explain concepts. As the saying goes, “an image is worth a thousand words.” In the digital age, this ratio is on the low size as the average word is 5 characters which can be stored using as little as 6 bytes (counting a word delimiter character) while a typical image can be several megabytes. When using an image on a web page, you will probably want to use an image that is the appropriate size for the page. This will reduce the size of the file as an image from a camera is usually a much higher resolution than what a typical monitor would display. Smaller files make a page load faster as there is less information needed to be transmitted. Another way of getting an image file to be smaller is to use something called compression.
There are two types of compression used for images. Lossless compression keeps the image identical but reduces the size by eliminating redundancy. For instance, a solid line of color can be stored as a single color and length instead of needing a color for every pixel in the line. Lossy compression reduces the quality of the image but generally produces much smaller files. Some artwork can be represented using vectors. This describes the image as a series of shapes which allows the image to easily be scaled to different resolutions while keeping the image sharp and is often used for illustrations. Different files use different types of compression, with there being numerous types of image file formats. Let’s quickly look at the most common formats.
- BMP – The Windows BitMaP format. This is an uncompressed image so tends to be large.
- GIF – (Graphics Image Format) was an older format which is still used due to support of simple multi-frame animations. Was mostly replaced by PNG due to patent/licensing issues.
- JPG – (Joint Photographic Experts Group) A lossy image format designed for photographs.
- PNG – (Portable Network Graphics) A replacement to GIF to get around patent issues that supports both 24 and 32 bit formats allowing for transparencies while offering lossless compression.
- SVG - (Scalable Vector Graphics) a vector-based image format that is an open standard (https://www.w3.org/TR/SVG/Overview.html) and is text based.
- WebP – (Web Picture format) Google’s attempt at replacing JPG, GIF, and PNG with support for lossy and lossless compression and even animation. Would be nice if it did take off, but I won’t hold my breath.
To use an image on your page, you simply need to use an img tag and indicate the source file you wish to use.
If the browser supports the image format of the file you have specified, the image will be displayed.
The source is a URL so works the same as the href attribute.
There is a subtle distinction between the two attributes being that href is referring to a link while src is referring to a resource used on that page.
While the image tag only needs the src attribute, it is considered bad to not include the alt attribute which provides an alternative description for the image and is used by screen readers.
For even more information about an image, a longdesc attribute, which links to a longer description of the image, can be used as well.
The width and height use to be considered optional but are now starting to be considered good practice as having the width and height will prevent the page from reshaping itself as images are loaded due to the page already knowing how large of a space to reserve for the image.
You can specify a size different from the image size which will cause the image to be resized after it has been loaded.
<img src="CSS3_and_HTML5_logos_and_wordmarks.svg" width="300" height="200" id="logo" alt="logos"/>

One of the more powerful uses of an image is to create a usemap. This allows you to have an image where different parts of the image are clickable and will take you to other pages or to bookmarks within the page. This is a very powerful but rarely used feature but we may as well quickly go over this feature. A demo of this is located here.
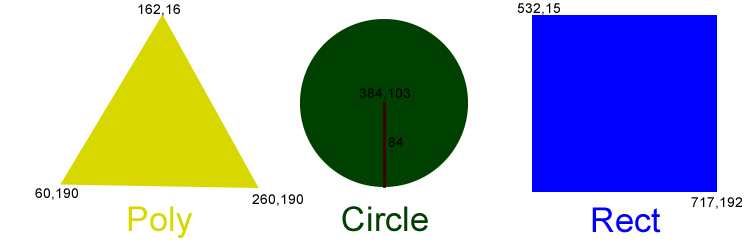
The clickable image map needs information about the links and coordinates. This is usually done within the HTML file by having a map tag. The figure above is a simple image with the coordinates of the relevant points shown. To use the map, you need to include a link to the map file. If the map tag is embedded in the page, use a # before the name of the map to indicate that the map is local. The code for the demo is simple enough:
<img src="clickmapDemo.png" width="750" height="250"
usemap="#demoMap" alt="demo click map" />
<map name="demoMap">
<area shape="poly" coords="162,16, 260,190, 60,190" alt="polygon" href="#poly" />
<area shape="circle" coords="384,103,84" alt="circle" href="#circle" />
<area shape="rect" coords="532,15,717,192" alt="rectangle" href="#rectangle" />
</map>
The map tag specifies the name of the map and within its content is a series of area tags. Each area tag describes the shape of a clickable area. There are four possible tags: default selects the whole image, poly describes a polygon, circle describes a circle and rect describes a rectangle. As each of these have their own way of describing the shape, lets go over each of them separately.
Polygons are simply a series of points. Each pair of points is connected by a line to form a shape. The coordinates are specified using an x,y format where the x coordinate is the distance in pixels from the left edge of the image and the y coordinate is the distance in pixels from the top edge of the image. You can specify the points in either clockwise or counter-clockwise order but should try to stay consistent. If the final point specified is not the starting point, then the browser will automatically add that point so it is common not to see the final point specified as it is always the same as the starting point. While you do not need to have spaces between the points, it makes reading the map much easier.
The circle shape is more traditional. You specify the center point of the circle as the coordinates, then have a third number which represents the radius of the circle. The x,y coordinates are expressed as distance from the left and top just like the polygon.
Rectangles use “rect” for the shape name, which is a common abbreviation in computer graphics. Again, x,y coordinates are relative to the top-left which math people tend to find annoying but makes perfect sense once you get use to the coordinate system. This time you need to specify the x,y coordinate of the top-left corner of the rectangle followed by the x,y coordinate of the bottom-right corner.
Each of the area tags specifies an href value to use so when that shape is clicked on, the user will be taken to the indicated URL. Remember that if you want to link to something within the page, you need to add a bookmark to that location by giving the element at that location a unique id and then use the # before the name of the bookmark to indicate that you are linking within the page. Relative or full URLs can also be used. The demo using the code above is located at https://github.com/BillySpelchan/FromScratchHTML_CSS_JS.
Creating the map can be a bit of a hassle, but there are tools available for doing the work for you. Personally, I just use my paint program to find the coordinates and manually create the maps but that is largely because image maps are rarely used as there are many easier options available now. The processing of the map can also be done server-side by using the ismap attribute. This sends click information to the URL that the image is linked to (so the image must be inside an anchor) but server-side work is beyond the scope of this book.
Sidebar
Chapter 2 Contents
2.1 HTML Basics Cheat Sheet
The cheat sheet for this chapter.
2.2 What is HTML
A brief history of HTML
2.3 Structure of a HTML Document
What makes up a HTML file
2.4 Tags and Elements
How tags are used to create HTML elements
2.5 Special Symbols
How to display things such as <, >, &, 😀
2.6 Links
Linking to other pages, other sites, and within the page
2.7 Images
Adding images and image maps to your page.
2.8 Lists
Ordered and unordered lists and nesting lists.
2.9 Tables
Tables with spanning rows and columns.
2.10 HTML Only Game Project
The game of NIM is the project for this chapter.
2.11 HTML Only Game Solution
How my solution to the NIM game was put together
Bonus article
Solving Nim.