
From Scratch Web Games: A Beginners Guide to Game Development using HTML, CSS, and JavaScript
Chapter 3.14: Webbus Solution
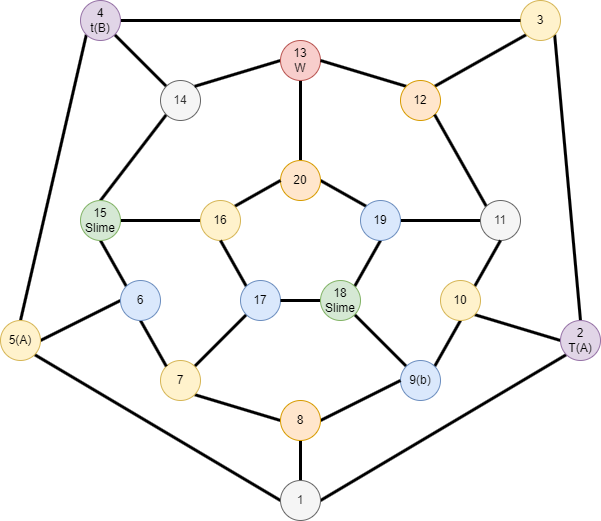
The first step to the game was to come up with the map. The original Hunt the Wumpus was based off of a squashed dodecahedron but had the location of the Wumpus and traps randomly located in the map. It also had the Wumpus moving. As we do not have JavaScript, this is not really possible in our simplified version of the game so to get around the lack of randomness and movement, the traps and Webbus have been hard coded into the map. To reduce the amount of art that needs to be produced, I decided to only have 4 different background images for the locations, in addition to the special pages for the traps. The image to use is color coded.
Once the map was worked out the next task was to work out the navigation. I wanted to keep things simple and use links, so in the CSS file for the game I set up some rules for making the links look like buttons. More details on how these work can be found in section 3.10, but the “button” code is as follows:
display: inline-block;
text-align: center;
font-size: 15pt;
text-decoration: none;
font-weight: bold;
color: #CAD;
padding: 1em;
margin: 5pt;
background-color: #250030;
border: 3pt outset #101;
border-radius: 1em;
box-shadow: 3px 3px 5px rgba(0,0,0,.80);
}
a:hover.nav_btn {
background-color: #400030;
color: #ECF;
}
We also want to set up some general layout rules. The biggest issue that we have to worry about is that there are different resolutions of displays, and even within the different resolutions, people don’t need to have the browser take up the full screen (I tend to have it half a screen myself). This means that there will be a lot of empty space. One solution would be to have different layouts based on the resolution, which is something we will be covering in later chapters. Another solution, which is my go-to solution, is to have borders around the content that scale so that the contents is in the middle of the display. I do this by having an outer wrap that has a color and aligns everything to be centered. Inside this, there is the content wrap layer which holds the game contents with a different background color.
text-align: center;
background-color: #404;
}
.contentwrap {
border-width: 1em;
display: inline-block;
background-color: darkblue;
width: 820px;
color: ghostwhite;
}
With this done, we can put together a typical room page. All the non-trap room pages will essentially be the same with the difference being the image used and the locations that the buttons lead to. Here is the body of the first room.
<div class="contentwrap">
<h1>Hunt the Webbus</h1>
<p class="desc">You hear a buzzing sound.</p>
<img src="webbusCaveA.jpg" alt="Cavern with three exits" />
<h2>What do you want to do?</h2>
<p>
<a href="room05.html" class="nav_btn">Take left exit</a>
<a href="room08.html" class="nav_btn">Take center exit</a>
<a href="room02.html" class="nav_btn">Take right exit</a>
<br>
<a href="arrow.html" class="arrow_btn">Shoot left</a>
<a href="arrow.html" class="arrow_btn">Shoot center</a>
<a href="arrow.html" class="arrow_btn">Shoot right</a>
</p>
</div>
</div>
You will notice that all the arrow links to this room lead to a single page. This is the losing page used for when the player has missed. In the three rooms where there is a successful shot, we link to a different page. The downside to this approach is that the player can cheat and take a look at the link, but it does save us 18 pages so I will assume that my players are playing the game honestly instead of having links to arrow shots for each of the 20 room.
The Slime and Webbus rooms simply lead to the end of the game so are trivial to put together. This leaves us with the teleportation trap. This turns out to be very simple as you simply need to display a teleportation image and a single button that takes the player to the room that the teleporter takes the player to.
Overall, not that difficult of a project. The source code to this is on the git repository.
Chapter contents
Chapter 3 Contents
3.1 CSS Basics Cheat Sheet
A cheat sheet covering the basics of CSS.
3.2 What is CSS
A brief look at what CSS is and how it came to be.
3.3 Setting up Style Sheets
A look at the three different ways to add style to your document.
3.4 Blocks, Spans, and Selectors
Setting the style for different types of elements.
3.5 Classes
An easy way of having multiple styles on the same element type and across different elements.
3.6 Colours
The use of named colors, the RGB color model, and creating RGB colors.
3.7 Hexadecimal color codes
Using hexadecimal color codes and other color models.
3.8 Fonts
Controlling what text looks like.
3.9 Box Model
The box model controls how elements are positioned within their layout box.
3.10 Link styles
Anchor element states and turning a link into a button.
Christmas Bonus
A total conversion of Hunt the Webbus with a Christmas Theme.
3.11 Styling lists
Lists can have style applied to their layout, placement, and bullet.
3.12 Styling tables
Tables have a grid as well as rows and columns that can be controlled.
3.13 Webbus project
The project for this chapter is a variation of a classic text game
3.14 Webbus solution
My solution for the Webbus project
3.15 Christmas Total Conversion
Converting the Webbus game into a Christmas game.