
From Scratch Web Games: A Beginners Guide to Game Development using HTML, CSS, and JavaScript
Chapter 3.9: Box Model
When it comes to laying out the page, CSS revolves around something known as the box model. Every element on the page is essentially a box. Every box obviously has its contents which is what we are going to display to the user. To this we may want to put a border around it. But what if the content needs some space between it and the border in order to say readable?
To allow for space between the content and the border, we have something that we call padding. This is simply a gap between the contents and the border, assuming we are having a border. We may also want some padding between the border and the border of adjoining elements. We will call this outer padding the margin. Combining these four elements gives us a box like the one below:
margin
border
padding
content
The size of the content is dependent on the content. Attribute tags do give us some control over the size by letting us control the width and height of the element holding the content. Some content sizes may not be known until the content is loaded. Setting the padding around the contents is simple as one only needs to specify the amount of padding by using the padding attribute:
This would work great if we want the padding to be the same on all the sides, but what if you want to have the padding on the top and bottom different from the padding on the left and right? CSS lets you do this by simply specifying two parameters for the padding attribute.
Often you will want different sizes for the padding on the top and bottom but the same size for the left/right padding. This is supported by using three parameters.
And, as it should go without saying, there is a four-parameter version:
You can also set each side of the padding individually using:
padding-left: size;
padding-right: size;
padding-bottom: size;
Surrounding the padding is the border which by default is no border. Borders are a bit more complicated as they not only consist of a size, but also have their own style and color. This means that you can only set all of the sides to the same value or need to used the side-specific versions of these commands. The all-in-one declaration is:
To set the individual sides, you use:
border-left: width style color;
border-bottom: width style color;
border-right: width style color;
The width is obviously how thick the border is. It can be controlled separately, and can be controlled for each side using:
border-top-width: width;
border-right-width: width;
border-bottom-width: width;
border-left-width: width;
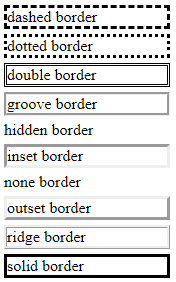
The style of the border is a description of how the border should be drawn. There are several different styles that you can use, with the supported list consisting of none, hidden, dotted, dashed, solid, double, groove, ridge, inset, outset. These are shown in the image below.
The style can be declared independently of the border attribute and each side of the can be styled differently by specifying the side you want to style:
border-right-style: style;
border-bottom-style: style;
border-left-style: style;
Borders can also have a color, and this can be set separately of the border attribute. You can set the color for the entire border, or specify the color of each side separately:
border-top-color: color;
border-right-color: color;
border-bottom-color: color;
border-left-color: color;
Borders can be rounded by setting a border radius. This uses a corner-specifying system similar to the way padding works. A single parameter indicates you are setting the radius for all corners, two sets opposite corners, three combines the top-right and bottom-left into the middle value, and four is individual starting at top-left and working clockwise.
border-radius: top-left_bottom-right top-right_bottom-left;
border-radius: top-left top-right_bottom-left bottom-right;
border-radius: top-left top-right bottom-right bottom-left;
border-top-left-radius: size;
border-top-right-radius: size;
border-bottom-left-radius: size;
border-bottom-right-radius: size;
Finally, margins are the gaps between elements. It works identically to padding except with
margin: topbottom leftright;
margin: top leftright bottom;
margin: top right bottom left;
This gives you a lot of control over the look of the page, with even more control over the look when we get to the layout aspects of CSS (grid and floats) which will be in chapter 6.
Chapter contents
Chapter 3 Contents
3.1 CSS Basics Cheat Sheet
A cheat sheet covering the basics of CSS.
3.2 What is CSS
A brief look at what CSS is and how it came to be.
3.3 Setting up Style Sheets
A look at the three different ways to add style to your document.
3.4 Blocks, Spans, and Selectors
Setting the style for different types of elements.
3.5 Classes
An easy way of having multiple styles on the same element type and across different elements.
3.6 Colours
The use of named colors, the RGB color model, and creating RGB colors.
3.7 Hexadecimal color codes
Using hexadecimal color codes and other color models.
3.8 Fonts
Controlling what text looks like.
3.9 Box Model
The box model controls how elements are positioned within their layout box.
3.10 Link styles
Anchor element states and turning a link into a button.
Christmas Bonus

A total conversion of Hunt the Webbus with a Christmas Theme.
3.11 Styling lists
Lists can have style applied to their layout, placement, and bullet.
3.12 Styling tables
Tables have a grid as well as rows and columns that can be controlled.
3.13 Webbus project
The project for this chapter is a variation of a classic text game
3.14 Webbus solution
My solution for the Webbus project
3.15 Christmas Total Conversion
Converting the Webbus game into a Christmas game.